

We will discuss what a standard exterior wall assembly looks like. We will discuss why it promotes heat transfer via conduction. Then, we will look at alternative methods of framing and special considerations that can be made to improve the thermal efficiency of various types of wall assembly's.
A standard exterior wall is built on top of a foundation/basement wall made from some kind of masonry product. We put sill seal between the bottom plate and the masonry wall for multiple reasons that we will not discuss here. The bottom plate is the piece of wood that sits horizontally directly on top of the foundation/basement wall. Next you install your vertical studs on either a 16 or 24 inch layout depending on what the blueprints dictate. On top of your studs there is a double top plate. Once your wall is framed, you install sheathing on the exterior side of your walls. Your sheathing could be any number of products such as OSB, Plywood or Zip are some of the more common sheathing choices. On this typical exterior wall assembly, you have two standard choices for material selection. Either 2x4s or 2x6s. Steel stud framing is usually reserved for commercial applications but in some circumstances either by code or by choice, some elect to use steel stud framing for residential construction as well.
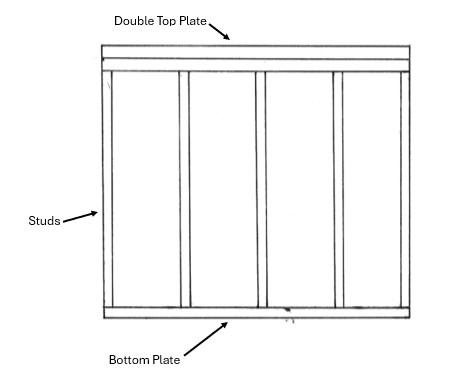
Now that a standard exterior wall assembly has been defined, we will walk through the ways it promotes thermal heat transfer via conduction. First, we will define conduction in the pursuit of being thorough. Heat conduction is the flow of internal energy from a region of higher temperature to lower temperature by the interaction of the adjacent particles (atoms, molecules, ions, electrons, etc.) in the intervening space. This is a fancy way of saying heat transfers because two or more things are directly touching one another. Honorable mention - heat transfers from hot to cold not the other way around.
The goal of preventing heat transfer is not just keeping hot air out in the summer but also keeping hot air inside the house during the winter months. We have a term to describe this called “conditioned space” and “unconditioned space”. Conditioned space is space inside of the house that we aim to control the condition of. This is where heat transfer via conduction through exterior walls comes into place. Heat comes from one place – The sun. The sun transfers heat to earth via radiation. The radiation from the sun heats up the cladding (outer most layer on a building such as vinyl siding or brick). The cladding transfers the heat to the layer it is attached to by the process of conduction. In a normal residential building, that surface is the sheathing. The sheathing transfers its heat to the studs. The studs transfer its heat to what is on the other side of it which in most houses is drywall. This is the path of heat transfer.
You may be saying but, but, but, what about the insulation??? Im happy you asked. In this system, the studs are in direct contact with the sheathing, allowing for conduction to occur. We know that energy takes the path of least resistance, and the wooden studs have a R value of roughly 1.25 R per inch. That means that a 2x4 stud has a R value of 4.375 and a 2x6 has a R value of 6.5625. Even though we have insulation between the studs energy likes to take the path of least resistance. It is easier for heat to transfer via conduction through the studs than to travel through the insulation. This causes the effective R value of your wall assembly to drop dramatically. Most people think their wall is the R value of the insulation they put in the wall and that simply is not the case.
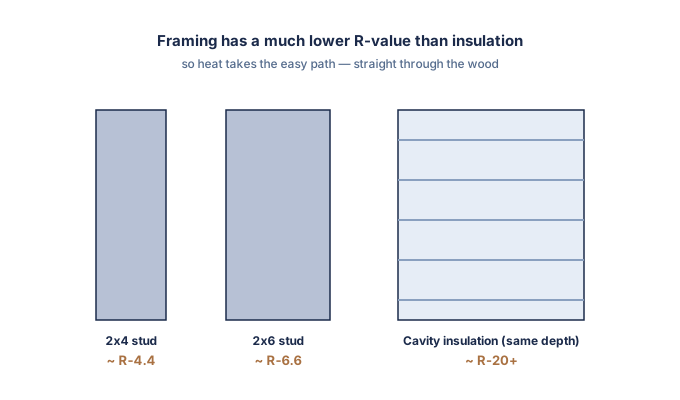
Steel stud construction is even worse. Steel has an insulation value of almost 0. Steel studs conduct heat rather than preventing it from being conducted. This means that there is actually a direct path from the outside to transfer its unwanted heat to the inside unless additional precautions are taken.
Starting at the outside of the house working in, the first thing we can do to prevent heat transfer is by creating a gap or thermal break between the cladding and the sheathing. This is called a rain screen. Rain screens provide an air gap which does a few things. To quote Dr. Joeseph Lstiburek “The goal is to decrease the wetting potential and increase the drying potential”. The goal of the cladding is to keep the rain water off of the sheathing. This is what decreasing the wetting potential means, we want to keep the sheathing as dry as possible. Keeping the sheathing perfectly dry is impossible. That is why we also want to increase the drying potential. If the sheathing gets soaked but can dry all the way out before it gets wet again, it will be able to last a very long time before it gets weak or rots. If your sheathing gets wet and does not have the ability to dry out, it will rot in a very short period of time. The rain screen accomplishes both things at the same time.
A rain screen can be as simple as using some 1x2s as firring strips and installing cladding over the firring strips. It can also be a product you purchase from a supplier. There are also many styles of rain screen product such as roll out mats that allow air to pass through, they can also be thin plastic strips with tiny holes to prevent bugs from living on the backside of your cladding. I will link some rain screen products here.
Depending on the color and material used for the cladding, temperatures have been recorded exceeding 200F in sealed/poorly vented wall assemblies. This is on the more extreme end of the temperature distribution but provides a good illustration of what is possible under the right circumstances. The temperature of the cladding on vented assemblies utilizing rainscreens and other venting methods, depending on many factors, has been measured falling in between 100-140F. This is a significant improvement over non vented assemblies.
This lower cladding temperature would have a significant effect on how hard your Air Conditioning would need to work in the summer to maintain your house at the desired temperature, lowering your utility bill measurably.
The next thing that we can do to limit heat transfer via conduction is exterior continuous insulation also frequently referred to as CI. There are two main categories of insulation products used for CI. They are rigid foam board and mineral wool. There are many kinds of rigid foam board and mineral wool style products. There are many articles already existing that explain what kinds of both of those products there are, why they are different and their individual use case, so I will not go into that here. CI is applied to the exterior of the sheathing. One of the main goals of CI is to move the dew point from the backside of the sheathing to some place inside of the insulation itself with the goal of preventing mold and water damage on the inside of the wall cavity. Some jurisdictions require CI to meet code, so that is also a good reason to look into CI as well.
This is another quote from Dr. Joe Lstiburek talking about CI except applied to a roof. It is from a podcast talking about ridge rot and ice dams. “when you have a change in phase (water turning from water vapor into liquid water) that energy has to go somewhere. The fiberglass and cellulose fibers do not have enough thermal mass to handle the change in phase energy you need a condensing surface with sufficient thermal mass to handle the change in phase energy, for condensation to occur that surface is the backside of the sheathing.”
The reason this quote matters to the conversation of CI is very clear when you understand what this means. Yes, when you do the math to figure out where the dew point will be, technically the dew point may be in the middle of the insulation. The point he is making is that you need a condensing surface. If you are using rigid foam board the water vapor in the air is not going to condense in the middle of the foam board. The water can't get to the middle of the foam board so how could it possibly condense there. It will either condense on the front side or the back side of the foam board because there is enough thermal mass to allow for the water vapor to change phase from water vapor to liquid water. I say all of this to help explain and debunk something many people say when trying to build a CI system that moves the dew point outside of the internal wall cavity. The false claim that is made is people will claim by using a CI system the dew point will be in the middle of the insulation and that is simply not the case.
Thermally decoupling framing members from the non conditioned outside air to the conditioned inside air. This is a crucial design consideration that when executed correctly will potentially save a homeowner 50% on their utility bills. Over the lifetime ownership of a home that amount of savings is 10s of thousands of dollars saved in addition to the home being a more comfortable living space. There are many ways to thermally decouple framing members, and here we will list them and go into detail for each one. Some of these are products and others are construction methods.
- Staggered Stud Wall
- Double Stud Wall
- Larsen Trusses
- Plywood Over Foam
- T-Studs
- Warm Studs
First, I will explain what thermally decoupling means before I describe how to do it. Thermal is a word we use to describe temperature. Decouple means to disconnect something that is or was connected. To thermally decouple something then means to build a thing in a way that prevents heat from traveling through it. To thermally decouple your framing members means to prevent the heat from traveling from the sheathing directly to the inside of the house as a result of all of the framing members from being in direct contact with one another.
The staggered stud wall is probably the cheapest and lowest performance option on this list. The reason it is the cheapest is because you need the least amount of additional lumber to build this wall assembly in comparison to the other options we will discuss. The studs are thermally decoupled, but the top and bottom plate are shared when using this design. The staggered stud wall shares a common 2x6 or 2x8 top and bottom plate with 2x4 studs. The reason that this wall assembly will not perform as well as some of the other options is because the top and bottom plate are not thermally decoupled like the studs are. This allows heat to transfer from the sheathing to the top and bottom plate to the inside of the house. These are a few examples of what a staggered stud wall is and looks like.
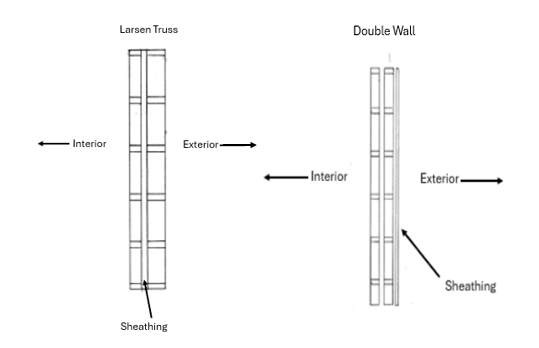
The next progression in the direction of increasing efficiency would be a double wall. Double walls for all intensive purposes are two walls that are basically identical that are built a few inches apart. A double wall has two separate top and bottom plates. This makes the two walls 100% thermally decoupled unlike the staggered wall. This 100% thermal decoupling improves the thermal performance of this wall assembly and makes it more expensive. Double walls can be made either out of all 2x4s, all 2x6s, or you could make the most exterior wall 2x6 with the interior wall 2x4. A secondary benefit of using a wall assembly like this is sound deadening. Sound travels via waves that are transmitted through walls. Sound travels through normal walls well because the right side of the wall is connected to the left side of the wall. When there is a double wall that is not true, the right side is not connected to the left side. This decoupling of the two sides of the wall makes things that happen outside such as storms, traffic, trains, high school football games, etc all much more difficult to hear inside the house. These are a few examples of what a double wall looks like.
The Larsen Truss is a wall assembly that is very similar to the double wall. The difference between the double wall and the larsen truss is where the sheathing is located. The sheathing on the double wall is on the exterior side of the exterior wall. The sheathing on the larsen truss is on the exterior side of the interior wall. Here are some pictures to help illustrate this.
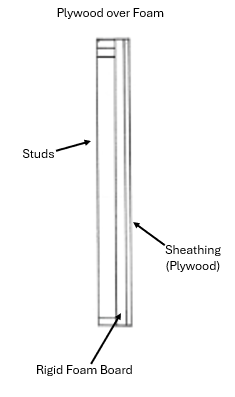
Plywood over foam can be built in a few different ways. Plywood over foam can either be installed as ZIP-R, which is ZIP sheathing with PolyIso bonded directly to the back of the sheathing. It can also be built using any choice of other materials such as installing XPS to the studs then OSB overtop. The idea behind this construction method is you have a standard construction wall and instead of installing sheathing on the exterior side of the wall, you install your choice of rigid foam board. By installing rigid foam board directly to the studs instead of the sheathing you have successfully thermally decoupled the cladding and sheathing from the framing members. One of the downsides to doing this instead of exterior continuous insulation is that the dew point is going to be on your sheathing increasing the potential of your sheathing rotting out if it is not properly ventilated.
In Conclusion
Traditional wall framing creates numerous paths for heat to move into and out of a home through thermal bridging, reducing the effectiveness of insulation and increasing energy costs. By understanding how heat transfers through building materials and incorporating strategies such as rain screens, continuous exterior insulation, and thermally decoupled wall assemblies like staggered stud walls, double stud walls, Larsen trusses, and insulated sheathing systems, builders can dramatically improve a home's thermal performance. These construction methods not only reduce utility costs but also increase comfort, durability, and moisture resistance, resulting in a more efficient and longer lasting building envelope.